LaserPaper gift tags
Preparations
Required Material:
Machine used:
Downloads:
- LaserPaper dark blue,270 g/m² (Serial no. 132544
LaserPaper is available in different colors for many occasions. Choose the color variant according to your taste!
- Speedy 360
- 80 watts
- 2″ lens
- Nozzle with small hole diameter
- Vacuum table with honeycomb table support
Step by Step
Step 1: Create the Design
In Ruby you can create graphic shapes and texts quickly and easily. Feel free to use our free graphic for the gift tag as a supplement.
Tips for creating graphics in Ruby can be found here: Create graphic & common line cutting.
Start Ruby and open a new worksheet in the “design” section.
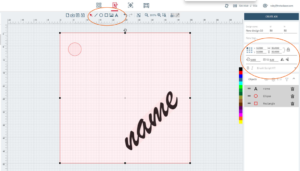
Create shapes: Select the color red and the shape tool “Rectangle” and hold down the “Ctrl” key while drawing a square on the workspace with a size of 50×50 mm.
Then select the “Ellipse” shape tool. Hold down the “Ctrl” key to create a small circle with a diameter of about 5 mm. The circle will be positioned at the top left of the square – each with about 4 mm distance to the edge.
Add text: To add a text select “add text” in the toolbar and write the desired name in the color black in the text field. Rotate the text field by – 45°.
Step 2: Import and duplicate graphic
Step 2: Import and duplicate graphic
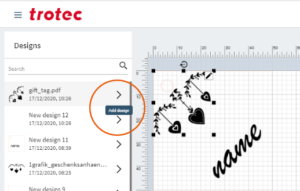
Import graphic: Next, upload the prepared graphic.
Now send your design to the “prepare” section to prepare the design for the laser process.
Integrate graphic: In the “prepare” work area, you can now integrate the graphic into your design. Arrange the uploaded graphic so that the garland is positioned in the upper left area of the square.
Duplicate and arrange the graphic: Copy the design in the number you want. Make sure that the individual squares are lined up directly next to each other. This way you can use the “skip overlapping cut lines” function to cut even faster and more efficiently.
Add names/personalize the graphics: Once all the little cards are created, you can add the corresponding names and personalize your products with them.
Position the print job: Place the file on the editing area. The laser pointer is used for orientation.
Step 3: Prepare laser process
Parameter settings, material effects: Now select the appropriate parameter for your material from the database.
Tip: You also have the option of adding your own materials to the database: see “Material Effects Ruby“.
For the LasperPaper in the color dark blue we used the following parameter settings:
Step 4: Start Laser Process
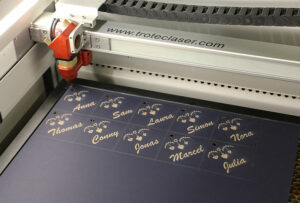
Start laser process: Send the print job to the laser using the “Queue” button. Switch to the “Queue” tab to execute the laser process by clicking on “Start”.
Step 5: Cleaning
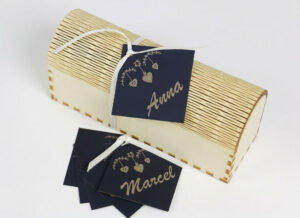
After the laser process, remove all cut cards from the laser. If necessary, carefully clean the laser paper on the surface with a soft cloth.